
Sustainable Roof Construction Bristol - Structural Roof Carpentry - Week 10
- paulalexanderwoodwork
- Mar 29
- 2 min read
With all the roof steels mostly in position the carpentry could restart, fitting the hip rafters was the first job for me. Also we had to put all the timber web packing in the steels which would allow for joist hangers and pickups. The timber packing is bolted into the steel with M12 coach bolts as with the top of the hips once they were slotted around the flitch plates.
First job was to get the hip timbers out, cut them to length and put a plumb and seat cut on them and then set them up in position to drop scribe them onto the purlin walls. We had to set them up an equal distance at the top and bottom, perfectly plumb above where they will end up and then transfer this same distance up from the purlin walls which gave us the scribe for the purlin walls. It was a small compound angled birdsmouth as the hip timbers are traveling at 45 degrees in plan view across the building and intersecting the corner of the purlin walls.
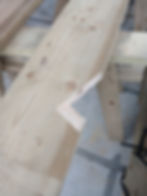
Once we had drop scribed them we could cut the backing angle onto the top edge of the hip timbers. As they were doubled up, there was a backing angle cut on to each timber. This brings the top edge of the hip timber into the respective plane of each roof pitch. Essential when dealing with thicker hip timbers.


At the bottom of one corner of the building we added a "dragon tie" to offer extra support for the huge seat cut on the bottom of the hip rafter. A nice little detail.


Showing the backing angle on the other hip timber and the connection detail at the top, where the hips and steel ridge intersect. The steels in this type of modern building construction in the UK make the roof geometry and connection details more awkward. It also doesn't help that most of these steel beams come with twist in them and often where they have been welded there is some distortion to the shape.


The main cranked ridge with its timber web packing sitting on the smaller steel post, transferring the load down into the floor steel.

A view down the other hip, the seat cut junction is a little different this side as we're between a wall plate on the left side and the cantilevered soffit joists on the other side. The lower jack rafters will join the hip and run down the side of the soffit joists and be bolted together with the joists using an m12 coach bolt and a toothed washer between, therefor supporting the joists as they protrude out of the building either side of the bay window.

Installing the flitch ridge for the connecting tunnel. The steel flitch ridge had a plate welded to the end to allow for connection the hip timber. It also had an additional flitch plate welded to it to carry the top end of the valley rafter.

Mocking up another junction between the hip rafter, one of the hip jacks and one of the cripple rafters.

Next week will be all go on cutting and fitting the jack rafters for the main roof and doing the timber ridges and rafters for the tunnel and extension roofs.