
Furniture making in Bristol | Behind the scenes | Mitred dovetail detail on the Ash cabinet.
- paulalexanderwoodwork

- May 31, 2025
- 4 min read
Updated: Jun 21, 2025
Furniture maker in Bristol, Paul Alexander, talks through making a handmade piece of furniture to commission.
This was a commission for some family friends in the Bristol area, which meant I had some amount of free rein to do something that I liked. The cabinet was for a television to go on top, and various boxes controlling the television to go underneath. That was pretty much the brief. I have wanted to do some mitred dovetails on a furniture carcass for a little while so I set about designing something up and got to work.
I used Ash from Warwickshire that a friend had felled, 1 1/4" boards. It wasn't olive Ash and was quite pale but was lovely and mild to work.
You can barely make out the board against my workbench and vice - also made from Ash.

Getting to work cutting the Dovetails.
I used a small guide for the saw, nothing fancy, just cut the desired angle on a scrap piece of timber that already had a nice rebate cut into it (a spare bit of window stock) and screwed on a small piece the other side so it saddled on to the carcass. I could then just hold it in my left hand while sawing with my right hand. The saw is a cheapish "gentleman's saw" (not keen on that name!). Nothing fancy, no expensive dovetail saw, just a car boot find that does the job just fine.
I like to cut a hair shy of the line and clean up with a chisel. It takes a tiny bit longer but in my opinion is worth it for that perfect joint. I wouldn't do this if I was making lots and lots of drawer boxes!

Sawing out the waste with a coping saw.

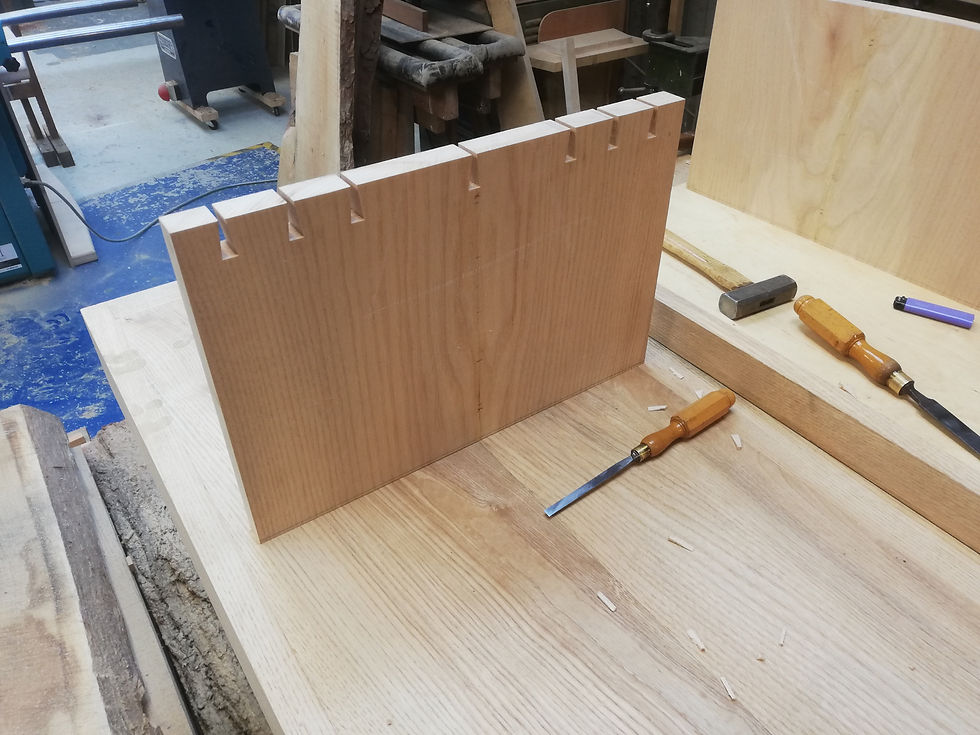
The completed dovetails.
I went for a pattern of a cluster of 3 pins on each side and then a central one, no particular logic here, just a purely aesthetic design detail.
Next job was to setup for marking out for the pins. A little care here goes a long way, and making sure both parts of the carcass are held securely while you're marking out will keep things good and accurate. There's nothing more frustrating than things moving while you're half way through the marking process. I used an Olfa (a type of japanese craft knife, widely available) to mark through the carcass sides on to the end grain of the top and bottom boards. It was just long enough to get through!

After sawing down the sides of the pins and clearing out as much waste as I could with the coping saw I got to the chiselling of the end grain between the pins, perhaps the more challenging of the jobs in dovetailing but with a razor sharp chisel and a good solid base to work against not too bad.
Looking back at this I probably could have gone a bit closer with the coping saw but on handmade projects like this the further you go in the more nervous you become about making a mistake!
You can see here on the right hand end I've already "roughed out" the mitre with the handsaw. We'll get to "paring" (using a chisel by hand) that in next.

Cleaning up the mitred end is a much more satisfying procedure as you are working across the end grain at 45 degrees. Compared to the end grain chiselling just done this feels like cutting butter! The only thing you have to watch out for here is as you fly off the end with the chisel you can split off the fibres on the back. I usually chisel most of the way up and then just before the end turn 90 degress and work into the pin i.e. across the grain.
I made a very quick guide for the chisel on the mitre saw using a piece of scrap.

I repeated this process on the cabinet sides with the dovetails in and after many cups of tea and hours of cutting the pieces were ready for a dry assembly.

First dry assembly looking good!


Next it was time to make a base frame, it was a fairly simple frame with morticed and tenoned rails/legs and a bridle joint in the middle.

Then it was on to making the cabinet doors, they are made from two pieces of Ash with a gap in the middle intentionally to allow the television remote signals to pass through without having to open the doors. To do this I joined them with 3 ledges (supports) with a sliding dovetail. This allows the boards to move with the seasons over time but keeps them locked together and flat.


For the cabinet doors I wanted to use two contrasting boards of Ash, so I found one piece that was almost perfectly quarter sawn, giving quite a straight grained and plain looking piece. In oak, where you have a pronounced medullary ray figure, quarter sawn boards can be very heavily figured and pretty, but in Ash without these pronounced rays you get a very plain board on the quarter. However, quarter sawn timber is still the most stable cut, so this was to be the bottom piece so the door would be hinged of this more stable piece.
For the top board, I opted for essentially the opposite cut, plain sawn. So from the end grain view the grain lines are running horizontally. This causes the grain on the top of the board to be diving in and out of the surface thus giving a highly figured look.
After this I added set in the hinges, made the walnut handles, put in the hidden magnetic catches (set into the wood with small walnut plugs covering them) and assembled.
The finished cabinet.


Comments